
Custom Film Sandpaper: How It Transforms Your Finishing Process
2026-09-29
Most finishers know the frustration of standard sandpaper that loads up, tears, or fails to reach tight contours. Custom film sandpaper changes that equation—it’s engineered for your specific substrate, grain pattern, and pressure, so you spend less time fighting the abrasive and more time perfecting the finish. At SHENZHEN SUN ABRASIVES, we’ve seen how the right film backing and coating turn a tedious step into a predictable one. Here’s what to look for—and how custom film sandpaper can reshape your workflow from first pass to final polish.
Why Standard Sandpaper Falls Short on Curved and Coated Surfaces
Most abrasive sheets are designed with a stiff, flat backing that works fine on straight edges and broad, level areas. But the moment you press them against a curved chair leg, a rounded cabinet door, or a contoured trim piece, that rigidity becomes a liability. Instead of conforming to the shape, the paper lifts at the edges, folds at the corners, or tears along the crease. You end up sanding only the high spots while the valleys stay untouched, forcing you to either switch to a smaller scraper or accept an uneven finish.
The problem gets worse on coated surfaces. Varnish, polyurethane, or paint layers tend to soften and gum up the abrasive grit when friction heats the surface. Standard sandpaper clogs quickly, leaving behind smeared residue and shiny patches that require extra cleaning or aggressive re-sanding. Because the paper can't shed the coating buildup effectively, you spend more time swapping sheets than actually smoothing the wood. The result is a frustrating cycle of loading, tearing, and starting over that feels nothing like progress.
What makes matters even trickier is that many factory-coated or curved pieces have subtle variations in thickness and sheen. A rigid abrasive follows the highest points only, so you lose control over the overall profile. Without a flexible, clog-resistant alternative, you're left fighting the material instead of guiding it. That's why so many woodworkers and finishers eventually abandon standard sandpaper for these tasks and look for something that can wrap around bends without sacrificing cut.
Matching Abrasive Grain to Your Exact Finish Requirements
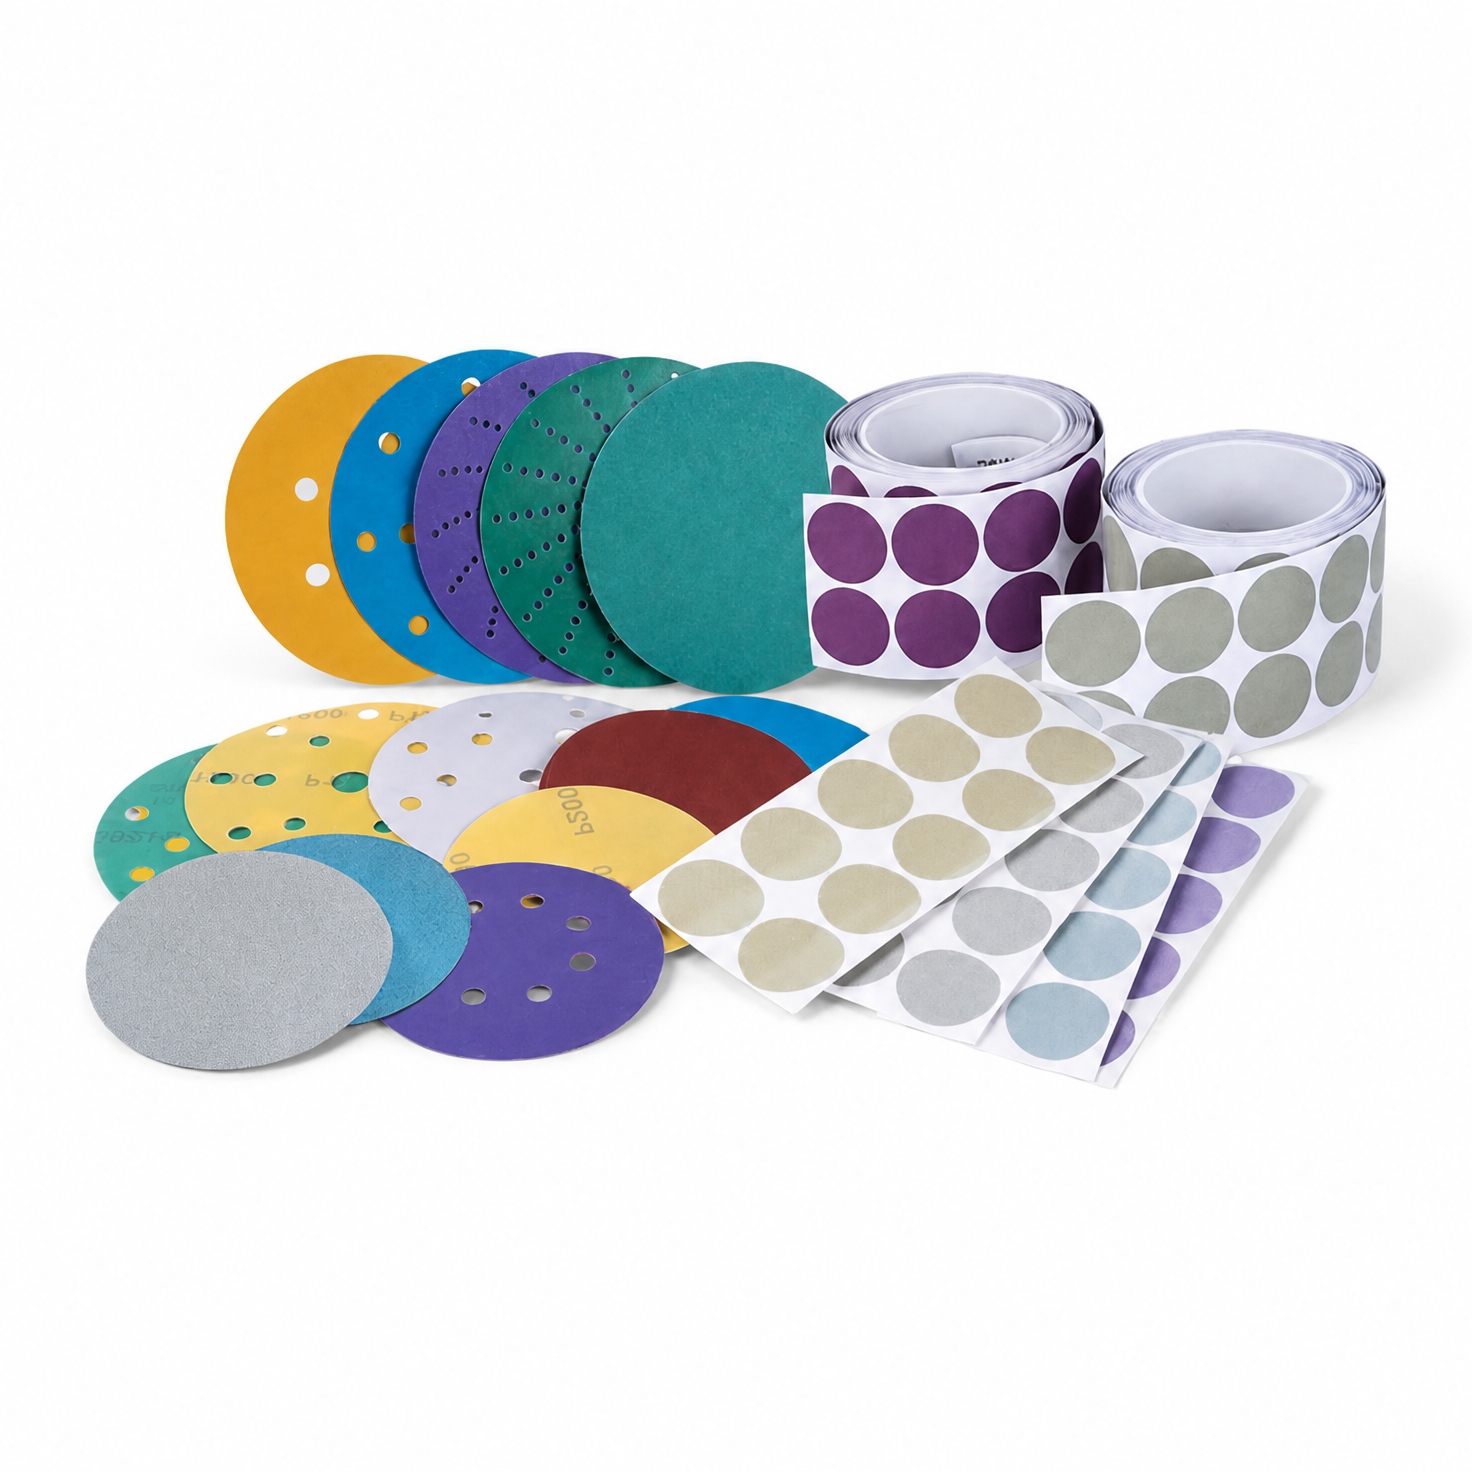
Grit selection is rarely a one-size-fits-all decision. A coarse 36 or 60 grain removes stock in a hurry but leaves deep scratches that demand multiple follow-up steps. Step up to 120 or 150 and you trade raw speed for a noticeably smoother surface. The trick is to match the grain not just to the material, but to the very last step in your process — because every intermediate grit only exists to erase the marks from the one before it.
Pay attention to how the abrasive fractures under pressure. Ceramic grains keep cutting as they wear, which works beautifully on hard alloys but can feel too aggressive on softer metals if you are chasing a delicate finish. Aluminum oxide tends to dull more gradually, giving you a more forgiving cut that is easier to control near final dimensions. Blend in a little zirconia for tough, heat-sensitive jobs and you get a balance that is hard to beat.
If you are after a near-mirror result, do not underestimate the jump from 220 to 320 to 400. That final refinement is where many people rush, and the surface shows it. Test on a scrap piece with the exact same pressure and speed you will use in production. The right grain matched to the right step will leave you with a finish that needs no apologies — and no extra buffing to hide mistakes.
How Custom Film Backings Reduce Edge Wear and Tearing
Edge wear and tearing often start at the weakest point of a film: the exposed border where adhesive meets the liner. Custom film backings address this by extending the backing material slightly beyond the film edge, creating a protective lip that absorbs friction before the film itself takes damage. This small overhang, often just a millimeter or two, means that when rolls are stacked, slid across a bench, or run through a label applicator, the liner takes the brunt of contact instead of the delicate film edge. Over time, that simple geometric change can dramatically lower the number of rejects caused by nicked corners and micro-tears.
Another way custom backings reduce edge damage is through material selection. Standard liners are usually chosen for cost, but a tailored backing might use a denser, more calendered paper or a thicker polyester film that resists moisture and curling. Curled liners are a hidden culprit: when a liner curls at the edges, it lifts the film away from the adhesive, exposing a vulnerable gap where tears can start. By specifying a backing with lower moisture sensitivity or a stiffer caliper, converters give the film a more stable platform. That stability means less flexing at the die-cut edges, fewer micro-fractures during handling, and cleaner peel from the liner at the point of use.
The reduction of edge wear also comes from how custom backings interact with the die-cutting process. A backing that is too soft or too brittle can deform under the die, causing ragged film edges that later propagate into tears. Custom backings are often matched to the film's thickness and stiffness, ensuring the die cuts cleanly through the film without crushing the liner. This clean cut leaves a smooth, well-supported edge that resists the stresses of label application, shipping, and end-user handling. In practice, switching to a custom film backing can cut edge-related returns by a noticeable margin, especially for labels used in high-wear environments like logistics, pharmaceuticals, or automotive parts.
Cutting Steps Without Cutting Corners in Multi-Stage Finishing
In multi-stage finishing, the instinct is often to add more passes, each with a lighter depth of cut and finer stepover. But a smarter approach removes redundant toolpaths while preserving surface integrity. By mapping the actual material left after semi-finishing, you can often skip a dedicated intermediate pass and move straight to a final pass with a variable-pitch end mill that suppresses chatter.
The real trick is to make each remaining pass work harder. Instead of three shallow finishing passes, use one adaptive clearing pass followed by a single finish pass with a wiper insert or a high-feed cutter in a stable setup. This cuts cycle time dramatically, but it demands that you tighten tool runout, check holder balance, and use dynamic toolpath engagement to avoid sudden load spikes.
Cutting steps doesn't mean ignoring risk. After consolidating passes, verify with in-process probing or a quick surface profilometer check on the first part. If the finish spec is Ra 0.8 µm and you hit Ra 0.6 µm with two fewer tool changes, you've cut steps without cutting corners—and gained floor time for the next job.
Real-World Gains from Tailored Abrasive Thickness and Flex
On a contoured fender or a handrail with tight bends, a standard abrasive tends to skip over low spots and dig into high ones. When thickness and flex are matched to the profile, the sheet follows the surface closely enough that pressure spreads out. That reduces deep scratches and the extra blending work they create. It also keeps the abrasive from folding or lifting at the edges, which is often where the worst unevenness starts.
For flat stock, the opposite tuning works better. A thicker, stiffer backing resists buckling under heavy hand pressure, so the cutting edges stay in contact instead of bouncing. Many shops find that using a small set of purpose-chosen abrasives lets them remove a separate intermediate grit step. Instead of burning through belts faster, the backing wears at a steadier rate because it is not being forced to do a job it was never shaped for.
The visible result is a more even surface with less edge rounding and fewer witness lines left behind. Operators also feel less fatigue in their fingers and wrists because the abrasive conforms to the workpiece rather than forcing the hand to compensate. On a busy production line, that shows up as fewer rejected pieces and shorter rework queues. It is a simple adjustment, but it changes how consistently the finish comes out.
Getting From Orange Peel to Mirror Gloss on the Final Pass
Chasing a true mirror finish means accepting that orange peel doesn't vanish in one heroic pass. It's a staged negotiation. Start by reading the surface under raking light—those ripples are highs and lows in the clear coat, and the goal on the final pass isn't to flatten everything blindly, but to level what remains without breaking through the top layer. A refining polish on a soft foam pad, run at moderate speed with just enough pressure to feel the pad bite, gradually trades texture for clarity.
The trick is letting the heat and movement do the work rather than forcing the machine. Slow, overlapping strokes let the abrasives break down fully, so the last few passes are almost weightless. You'll notice the reflection sharpens without wiping away—edges stop glowing and start cutting. That's the signal the peel is giving way to gloss. Keep the pad clean and the working area small; too much polish left on the surface hides what's actually happening.
Only after the final whisper pass should you introduce a high-lubricity finishing polish. It's not about removing more material now, just refining the micro-marring the leveling stage left behind. Work until the residue turns clear, then wipe with a plush towel. Under a point light, the reflection should hold steady from every angle—no ripple, no haze. That's the difference between a shiny car and a mirror.
FAQ
Custom film sandpaper uses a polyester film backing instead of paper or cloth. That makes it tear-resistant, flexible, and far more uniform in thickness. The abrasive layer can be tailored to a specific grit, mineral, and coating pattern, so it behaves consistently on contoured or flat surfaces where ordinary paper would buckle or wear unevenly.
Paper backings tend to break down under pressure, especially when wet or used on sharp edges. Film holds its shape, resists clogging, and delivers a flatter, more predictable scratch pattern. For anyone chasing a flawless topcoat or high-gloss surface, that consistency means fewer surprises and less rework.
The film backing keeps the abrasive grains at a steady height and spacing, so there are no high spots from wrinkled paper or uneven adhesive lines. That controlled abrasive surface translates into fine, even scratches that disappear quickly in the next grit step instead of leaving random deep marks.
Yes. The polyester backing is waterproof and resistant to most solvents, so it works equally well with water, lubricants, or dry. Wet sanding with film tends to produce less dust and heat, which is especially helpful on automotive clear coats and fine wood finishes.
You can specify all of that. Typical options include abrasive mineral type, grit range, backing thickness, disc or sheet dimensions, hole pattern for dust extraction, and attachment method such as pressure-sensitive adhesive or hook-and-loop. It gets matched to your sander and your specific finishing step.
The per-disc price is usually higher than generic paper, but the working life is much longer and the cut stays consistent from first pass to last. Fewer disc changes and fewer touch-ups on a rejected surface often bring the total time and material cost down, especially on high-end projects.
Absolutely. It is widely used for automotive clear coat leveling, fine wood sanding between coats, metal polishing, composite work, and even solid surface fabrication. The key is selecting the right mineral and grit progression for the substrate and coating being worked.
Start with the material you are sanding, the finish level you need, your sander model, and whether you work wet or dry. Share that information with the supplier and ask for a small sample pack. Testing against your current process will reveal the real difference before committing to a full run.
Conclusion
Standard sandpaper tends to fight you on curved panels and freshly cleared surfaces, leaving uneven scratch patterns and premature loading. Custom film sandpaper changes that dynamic because the backing and abrasive are chosen to match the actual surface you are finishing rather than forcing one product to do everything. A finer or harder grain can be paired with a thin polyester film to cut cleanly through clearcoat without digging into soft contours, while a more flexible backing lets the sheet follow crown lines and tight radii without skipping. The result is that edge wear and tearing drop off noticeably; the film resists creasing when folded over a soft block or wrapped around a finger, so you keep a consistent cut longer instead of chasing frayed edges that leave deep random scratches.
That consistency also pays off in multi-stage work. Instead of jumping through three extra grits to remove damage from a previous step, you can move from 800 to 1500 to 3000 with less hand pressure and fewer panel wipes. Tailored thickness and flex give you real control over how aggressive the cut feels, whether you are dry sanding a hard clear or wet sanding a fresh blend area. On the final pass, this is what takes a surface from orange peel to a mirror gloss without haze or pigtails. You are not relying on a heavier compound to hide sanding marks; the film has already leveled the texture cleanly enough that polishing becomes a quick refinement rather than a correction step.
Contact Us
Contact Person: Amanda Wang
Email: [email protected]
Tel/WhatsApp: +86-13602569854
Website: https://www.sunabrasives.com.cn